Script Out Everything - Initialize Your Windows Azure VM for Your Web Server with IIS, Web Deploy and Other Stuff
Related Posts
Today, I am officially sick and tired of initializing a new Web Server every time so I decided to script it all out as much as I can. I created a new Windows Azure VM running Windows Server 2012 and installed Web Platform Installer v4 Command Line tool (aka WebPICMD.exe).
Next thing I need to do is to install the IIS Web Server Role inside my VM. To do that, I opened up the Server Manager and closed it instantly because I didn't wanna do that through a GUI either. It turned out that it is fairly easy to manage your server roles and features through PowerShell thanks to ServerManager PowerShell module. This module has couple of handy Cmdlets which enable you to manage your server’s roles and features.
To install the IIS Web Server, I run the following PowerShell command. It installs IIS Web Server (along with the necessary dependencies and management tools) and logs the output under the TEMP folder.
$logLabel = $((get-date).ToString("yyyyMMddHHmmss"))
Import-Module -Name ServerManager
Install-WindowsFeature -Name Web-Server -IncludeManagementTools -LogPath "$env:TEMP\init-webservervm_webserver_install_log_$logLabel.txt"
When we look at the installed features, we should see that IIS Web Server is now listed there:
At this stage, we have a few more necessary features to install such as ASP.NET 4.5 and Management Service. Optionally, I always want to install Dynamic Content Compression and IIS Management Scripts and Tools features. To install those features, we will run the following script:
#add additional windows features
$additionalFeatures = @('Web-Mgmt-Service', 'Web-Asp-Net45', 'Web-Dyn-Compression', 'Web-Scripting-Tools')
foreach($feature in $additionalFeatures) {

    if(!(Get-WindowsFeature | where { $_.Name -eq $feature }).Installed) {

        Install-WindowsFeature -Name $feature -LogPath "$env:TEMP\init-webservervm_feature_$($feature)_install_log_$((get-date).ToString("yyyyMMddHHmmss")).txt"
    }
}
#Set WMSvc to Automatic Startup
Set-Service -Name WMSvc -StartupType Automatic

#Check if WMSvc (Web Management Service) is running
if((Get-Service WMSvc).Status -ne 'Running') {
    Start-Service WMSvc
}
As you can see at the end of the script, we are also setting the Management Service's startup type to automatic and finally, we are starting the service.
Now the IIS Web Server is ready, we need to get a few more bits through the Web Platform Installer v4 Command Line tool. With all of my web servers, there are two concrete tools I would like to have: Web Deploy and URL Rewrite Module. We can certainly install those manually but we can also script out their installation. WebPICMD.exe allows us to install products through command line and the following command will work for us:
$webPiProducts = @('WDeployPS', 'UrlRewrite2')
.\WebPICMD.exe /Install /Products:"$($webPiProducts -join ',')" /AcceptEULA /Log:"$env:TEMP\webpi_products_install_log_$((get-date).ToString("yyyyMMddHHmmss")).txt"
I assume that WebPICMD.exe is under your path here (if you have installed the 64x version of the product, you can find the executable file under C:\Program Files\Microsoft\Web Platform Installer). When the installation is complete, we should see the success message:
Well, we have completed most of the work but there are still couple of things to do. First of all, we need to allow incoming connections through TCP port 8172 because this is the port that Web Deploy will talk through. To enable that, we can go to Windows Firewall with Advanced Security window but that would be lame. Are we gonna use netsh? Certainly not :) With PowerShell 3.0, we can now control the Windows Firewall with Advanced Security Administration. This functionality is provided through NetSecurity PowerShell module but with the new dynamic module loading feature of PowerShell 3.0, we don’t need to separately import this. The following command will add the proper firewall rule to our server.
New-NetFirewallRule -DisplayName "Allow IIS Management Service In" -Direction Inbound -LocalPort 8172 -Protocol TCP -Action Allow
Lastly, we need to inform windows azure about this firewall rule as well because all the requests, which come from outside, will go through the load balancer and it doesn’t open up any ports by default (except for Remote Desktop ports). You can the endpoints through Windows Azure Portal but Windows Azure PowerShell Cmdlets to add this as well. The following command will add the proper rule. Just change the $serviceName and $vmName according to your credentials:
Get-AzureVM -ServiceName $serviceName -Name $vmName | Add-AzureEndpoint -Name "WebDeploy" -Protocol TCP -LocalPort 8172 -PublicPort 8172 | Update-AzureVM
When we look at the portal, we should see that our endpoint was created.
Now, everything should be working perfectly. Of course you also need to add TCP port 80 to your Endpoint lists for your VM in order for your web sites to be reachable through HTTP (assuming you will only use PORT 80 for your web applications). To test everything out, I created a web application under IIS. Then, I right clicked on it and navigate to Deploy > Configure Web Deploy Publishing.
This will bring up another dialog. This is the place where we can configure web deploy settings. There are other ways to do this as well.
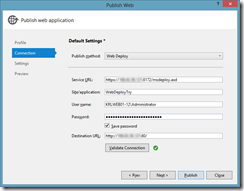
Just change the VM name with your VIP address and this will generate a publish profile. We can now use this publish profile file to push our web application to the server.
When the publish is completed, we will see the complete result inside the Output window.
We jumped through lots of hoops to get this done but how is this better than doing it manually? Imagine that you bring all these scripts together and run them through multiple VMs. It’s going to save a lot of time for you. I am not an IT pro. So, this is enough to make me happy because I just proved that nearly everything that a web developer needs can be automated through PowerShell or various command line tools.
Update:
I put these together inside one script file. Follow the instructions inside the script and you will be good to go.
https://gist.github.com/3742921#file_init_web_server_vm.ps1
This doesn't add the endpoints for your VM. For this, you have another script as well:
https://gist.github.com/3742921#file_init_web_server_azure_vm_endpoints.ps1


